Showing posts with label planting. Show all posts

Lasagna Gardening - How To Start A Garden


Contents of this very long article on starting a garden: 

- Lasagna gardening - an explanation
- How to make a no till garden on your lawn
- Raised gardens
- Organic Mulch Layers
- How to plant in a lasagna garden
- Weeding
- Going Vertical


Lasagna gardening is a no-dig, no-till organic gardening method that results in rich soil with very little work from the gardener. The name "lasagna gardening" refers to the buildup of layers of organic material on top of cardboard or thick newspaper, also known as “sheet composting."


One of the best things about lasagna gardening is how easy it is. You don't have to remove existing sod and weeds or dig at all. The first layer consists of either brown corrugated cardboard or at least six layers of newspaper laid directly on top of the grass or weeds in the area you've selected for your garden. Cover the garden areas with cardboard as soon as the snow is gone. Corrugated cardboard, that used for brown boxes, is best for the food areas. Worms love it! You can use other types of cardboard for the paths and open areas, i.e. soda can cases, cereal boxes, magazines. While you don't need to remove the grass and weeds, I would remove rocks. They are great for holding cardboard in place or using for stepping stones through the growing plants.

Wet the cardboard/paper area down to keep everything in place and layer with organic materials. The grass and/or weeds underneath will break down fairly quickly because they will be smothered by the newspaper or cardboard, as well as by the materials you're going to layer on top of them. Overlay the edges, or the grass will grow through! This layer also provides a dark, moist area to attract earthworms that will loosen up the soil as they tunnel through it. If you don't yet have organic layers, you can keep the cardboard down with rocks, bricks, logs or anything else you have that will keep it from blowing away. 

If you already have larger plants in place, layer the cardboard around them, giving them an inch or so of space to keep the wet cardboard from touching the stems. Layer organic mulch on top of this. Do this as the summer wears on and the initial paper/cardboard starts to break down. Continue to layer around the mature plants to keep the grass and weeds from growing. When making a garden on a lawn, grass will be a more insidious problem than weeds. 


It's a great way to get rid of your lawn. If you're on a reasonably small city lot, what do you need grass for anyway? It has no practical value and takes a lot of chemicals poured on it to keep it looking nice. (Why anyone would pour deadly, noxious chemicals in the earth for a useless lawn is beyond me.) If you have soft lawn, you don't need it tilled first. If you have hard clay, gravel, etc and are adding top soil/manure, I would till it first if you want to use it right away or make raised gardens. (See below.) If you are going to wait until the following year, let the worms do it for you under the cardboard. 


Raised Gardens: 

If your ground is very hard clay, gravel, sand or rock, I would recommend making raised gardens. They don't have to be deep but higher sides makes gardening easy for people with bad backs or physical limitations. Also keep it narrow enough to reach across from one side. Three feet is the widest across I would build one. It can be any length or even U-shaped. Build boxes to contain soil on top of the lawn. You will still need to do the layering with cardboard/paper inside the box. You would be surprised how far some grass and weeds will grow to survive! 

Filling the raised boxes: "Hugel Culture" (Hugelkulture) is making beds on top of log piles. Its quickly catching on as a way to make raised garden beds, letting the old logs feed the soil and plants. Fill those raised beds with natural branches and logs on top of the cardboard, before you fill it with soil. You will need less soil. Put several inches of soil on top of the wood. Layer this with mulch to keep the weeds down. They will grow on any open dirt spots, even in raised beds. The wood will decompose and feed the soil, gradually. The plant roots will grow into it. In three years the logs will be gone, making rich soil. 


If building tall boxes, fill the bottom with something to take up 
the space, something inert, nontoxic that the plant roots can grow around so you will need less soil. Top soil is hard to find here. Suggestions are: natural branches and logs (NOT railway ties, landscaping ties or pressure treated!), styrofoam packing pieces broken up small and styrofoam peanuts, small water bottles, crushed milk jugs, soda cans. Leave enough space for about 1.5 feet of soil on top, after it filters down through the space fillers at the bottom. Don't leave air pockets. Make sure the spaces are filled with soil all the way down. Mix in a little well composted manure in the bottom soil. 


You can make raised beds out of anything that will hold the soil in. Square straw (not hay!) bales are becoming popular for raised bed sides. Its not ideal to use pressure treated wood, but if you line the boxes all the way around and over the top with heavy plastic, it will be fine. You can use metal roofing or panels for sides.

Large logs make good raised garden sides. Cement blocks can be used if they have been outside for a couple of years so the strong lime has been leached out of them. Otherwise, I would line a cement block garden with heavy plastic. 

Raised bed are also easy to cover. Use 1" pvc for the arches, cover with plastic for a mini greenhouse, or curtain sheers for protection from deer, cabbage moths, etc. 


Organic Mulch Layers

Anything that does not contain meat, dairy, egg products of any kind, or sprayed can be used as mulch on the cardboard/paper. Meat products, eggs, dairy will stink terribly and attract wildlife that you don't want in your garden (bears!). Its also not a good idea to use processed food/ grains/ cereals in your compost pile. Never put cereal in it that has had milk on it! If you use something that has been sprayed with weed killer or herbicide, it will kill your plants. 

Some choices for organic mulch layers:

1. Manure! I would recommend using well composted ** (See Note below) manure around the growing areas directly on top of the cardboard/paper. If your lawn has been growing grass and/or weeds, the soil will be depleted. Also any wood based layers you have will use up the nitrogen in the soil as they break down. The manure will fix that and replace any other needs in the depleted soil.  
2. Grass clipping after mowing, if not sprayed, 
3. Fall leaves, mowed to chop them up, 
4. Shredded computer paper. Ask offices for it. Its wood based,
5. Wood chips * (See Note below on wood based mulch in the garden),
6. Straw,
7. Hay, only if going on top of cardboard. Don't put it directly on the ground or you will be growing grass there,

*NOTE: Wood based products are fine in the garden, as long as you add some well composted manure for extra nitrogen. Wood uses up the nitrogen in the soil to decompose. 

**NOTE: Make sure any cow/sheep manure you use has been properly composted: piled for a season so it gets really hot, hot enough to kill the weed seeds, or you will be growing grass and weeds. If you are not sure how hot it has been composted, put it underneath the cardboard. If it has not aged enough, the high nitrogen content will kill your plants. Chicken manure needs to age for two years before you can safely put it on your plants. Store bought manure is fine. 

Planting: For the seed rows, 

Option #1: Put down a layer of fine soil or compost on top of the mulch for the seed rows and plant in it. Top the seeds with soil and press down lightly. A rule of thumb for how deep to plant seeds: Soil on top of seed should only be as tall as the length of the seed. So something like carrot seed should only have a light sprinkle of soil on top. The roots will grow down through the layers and eventually through the cardboard. 

Option #2: Lay the initial layer of cardboard, leaving 1.5" - 2" inch rows open on the ground for planting seeds. Cover the cardboard with organic layers. On top of the organic layers, keeping it visible, cover your open seeding rows with cardboard you have weighed down with rocks or bricks to hold it in place temporarily. When planting time comes, most grass and weeds will be dead and smothered under the cardboard. Remove the top cardboard over the planting rows. Plant seeds directly in the ground in these very narrow rows and cover lightly with a layer of compost. Water very gently and press down lightly. 

For myself, I usually use a shovel and dig up just these narrow rows and remove grass clods, roots and any perennial weeds before laying down the cardboard. However, I don't believe its entirely necessary. I just like to spend a little time in the spring digging in the dirt :) . 

For transplants, simply pull back the layers of mulch, drop in the plant and pull some mulching materials back over the roots. Leave a little space around the plant for air circulation.

Weeding:  As you watch these rows grow, carefully leaving only the sprouting vegetables, pull up or cut off any weeds/grass that grows. If not sure, just leave it to grow awhile and then pull up or dig out any weeds that grow in this row with the vegetables. If left to grow, grass will become a more insidious problem than the weeds. As long as the weeds don't go to seed or interfere with the growth of the baby vegetables, they can be left to grow until its safe to remove them without damaging your tender, baby vegetable plants. There won't be much to weed out and once it's gone, weeding these very narrow rows will be easy. When the vegetable plants are tall enough and you have thinned them, place cardboard and mulch between the plants to keep the weeds/grass down. Keep placing cardboard and inches of mulch wherever grass and weeds begin to grow.

I recommend setting aside one day every week for weeding. Using a hoe for larger seedlings or by hand with smaller ones, weed the entire garden, covering with cardboard those areas where the grass and weeds are growing. If you have been using the cardboard everywhere around the plants and in the open areas, there won't be much to do. One morning a week, weeding needs to be your focus, everything else waits. If you do this, you won't have a weeding problem and gardening will be fun and easy. Pull baby weeds as you do your daily walk through your garden to see the changes and just to enjoy your garden growing. Pull any grass and weeds you see when they are little. Don't let the work get ahead of you or it will take time to catch it back up. Note: Control the grass. Grass is hard to control once it takes over.

Going Vertical


If you only have a little space, grow vertical! Make tall plants trellises over the pathways. If you are growing something like squash or 
melons vertically, you will need strong supports to hold the vine up and something extra to hold the fruit. 
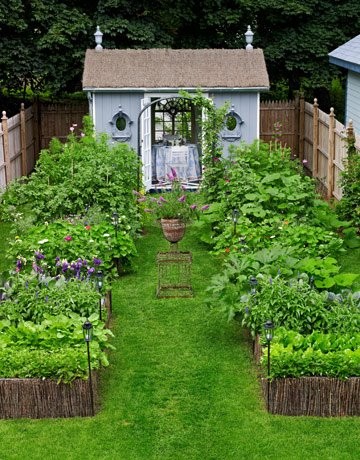
(Not my yard)

Lasagna gardening is definitely the way to build vegetable or flower beds! We use this method for both. Because it uses no power tools, heavy equipment or expensive commercial additives, lasagna gardening is an easy way for anyone to maintain garden productivity.

If you have deer or large dogs roaming around the neighborhood, you might want to put a fence around it. It will keep out the dogs, anyway...


Winter Sewing


Russel Lipins
The lupins are coming up! These are Russel Lupins. They come in various colours but purple is the most dominate. Since these are from open pollinated seeds, they are probably purple, but I'm ok with that. The odd one might be a different colour. I'm hoping to get one red one.

These seeds were planted in December and put outside for the remaining winter months. I lost track of them outside when the snow was deep, but found them again a few days ago. I brought them inside and put them under lights in the warm house. Now they are coming up! I planted with them with several other perennial seeds but these are the only ones up, so far. It has only been three days. I'm sure the others will start sprouting in the coming weeks. 


Early Spring Seeding

With the onset of spring, comes renewed hope for the future year. This is the time to bring out the seeds I harvested from our own land, as well as the seed I purchased, traded for and actively sought after. It is a time to decide what to plant and where; and to generally plan for the season to come. Spring is an exciting time for us, with great expectations for the new growing season upon us!


Many of my seeds need to be planted early indoors, as our growing season is somewhat short and I like to grow many things from warmer climates. To this end I have installed a cold frame. This will be our first year to use it and I plan to fill it to the brim with early seedlings. I have already started planting many seeds for germination in the seed window which faces south and has a large sill with shelves.


While I do use small commercial peat pots, when I have them, I have begun to make my own using newspaper or toilet paper rolls. It's so easy, free and it breaks down in the soil so the roots can grow through. This means no transplanting is necessary. Just plop the newspaper pot into the ground or a larger pot, fill with soil and water. I do still put a few cuts in these pots near the bottom when planting into the ground, so the roots can grow through it quickly.


To make newspaper pots, I wrap a piece of newspaper, cut to the right size, around a pill bottle so that both sides overlap a bit, and tape it. I use a tiny piece of paper masking tape to hold it in place at the top and bottom of the side. I don't put tape on the bottom of the pot as it is folded over and I want the roots to have the freedom to grow through. I like the paper pots because you can jam more of them into a space, since their shape can be somewhat warped and they can be forced to fit. Here are several placed in a clear plastic cookie container from the grocery store. The lid will be closed until they sprout then propped open for air flow, or removed altogether. These containers are marvelous for winter sowing of seeds needing winter stratification outdoors, as well.


Some seeds will need special treatment before being planted in the soil, such as the winter temperatures mentioned above. These canna seeds must have the seed coat removed in one tiny spot before planting, so the water can enter. I had to use the drill with a rasp to thin the seed coat on these babies! These are very hard seeds! I also soak them for a few days in warm water to start them off. This makes for a much quicker germination than direct planting. Many other seeds need special treatment.


Some need the seed coat nicked or thinned, some need just soaking in warm water, some need winter freezing temps. These I either put in the freezer or winter sow in containers outside on the deck. There are a few, such as strawberry and impatiens seeds, that need light to germinate. It is a good idea to know your seed before planting time comes. These seeds have gone through the winter outdoors and should be sprouting soon.

I will occasionally spread some seeds out between damp paper towels until they sprout. Then cut them out with the paper towel and plant the whole piece. This way the seeds absorb moisture, swell and germinate before planting, letting you know if they are viable. This is a good practice with old seeds or when you only have a few seeds and don't want to waste any. 

This is a plastic serving tray rescued and reused as a tiny greenhouse for sprouting seeds. Recycling is great for the environment and the pocketbook!


We have already planted many of the early seeds, the hardy ones that can go out into the garden as soon as it is dry enough to walk out there. Green peas and most brassicas can be planted directly into the garden as soon as May is here. We have kholrabi and broccoli already up and growing in the seed window, both brassicas. Also in the brassica family are cabbage, brussel sprouts, turnip and rapini. I will be planting brussel sprouts as soon as I get the seeds. (It's a time issue.
I have none!) We love young, tender brussel sprouts!


Also recently planted, are the dwarf white and orange canna seeds discussed earlier, cana lilies and 4 O'Clocks, soaking here in water for a few days. I have never grown cana lilies before and I am looking forward to it. Directly seeded just this weekend are garlic chives, red currents, ground cherries and bell peppers of all colours. I have plans to sow the tomatoes, luffahs, ornamental gourds, giant Halloween pumpkins, watermelon and cantaloupe tomorrow. I have some seed for special coloured decorative corn that I would like to start early but I don't know if there will be room for it.

Most of these seedlings will go into the cold frame, if it gets warm enough for them. (We had more snow this morning.) Our new coldframe, pictured below, has a glass top .


Labelling the seedlings is a bit of a problem. Most ink and marker will be worn away and faded by the rain and sun of the outdoors. I use coloured paper clips from the dollar store to mark groups of pots, or individual pots, then record the colour clip with the type of seed planted in my garden journal. I do use other labels for my plants. Many are made from old horizontal window blinds that I have taken apart and cut into short pieces. Some ends already have a hole in them for tying it to a small shrub branch. I use cut up plastic ice cream containers and cut styrofoam pieces. I like these because the pen leaves an indentation in the Styrofoam. This indentation remains even if the ink fades and it can still be read in good light with glasses on...and maybe a magnifying glass. I am continuing my search for the perfect marker that will last through the sun and weather without fading. I may try nail polish on wood this year, if I have time.

A garden journal is priceless for those of us with poor memories. I record what I plant, and where, so there are no surprises and no seedlings pulled because I forgot I planted them there and thought they were weeds. I lost an entire package of primrose seedlings like that last year! Darn!  I also do my large garden planning for crop rotation in my journal. I record a list of the seeds that I have to trade, a list of seeds I am looking for, seeds that I have wintersowed, growing tips that I want to remember to use and creative ideas that suddenly come to me. You know...the ones you get in your sleep when you have nothing to write on. When I'm feeling the need to garden in the dead of winter with ten feet of snow and minus 100 temperatures (slight exaggeration) I can always read my garden journal from last year and remember summer. A garden journal is a great tool and a must for anyone with a large garden.


Altogether so far we have planted for the windowsill: bell peppers (yellow, orange, red, green), broccoli, kholrabi, brussel sprouts, garlic chives, red currents, ground cherries, Halloween pumpkins, luffahs, matrimony vine, watermelon, cantaloupe, cannas, 4 O'clocks, Incarvillea, cana lilies, sage, comfrey and 3 kinds of tomatoes.


Collecting and growing new things from seed is always a great experience! Seedlings don't grow exactly like the parent. Some see this as a drawback but I see it as an adventure. A hand full of seeds is like a box of chocolates, you never know what you're going to get!

Other posts on spring seeding:  
"Spring Seeding"  March 2013 
"Building A Coldframe" - May 2012
"Edoes and Elephant Ears" - Aug 2012
"Cannas From Seed" 


Spring Seeding


Spring is not here yet, however I can get a head start on it by planting some seeds indoors. Actually, I started seed about two months ago, during the Christmas holidays. These were canna seeds that I got in a trade. I planted about 40 seeds early because I thought they would take a couple of months to germinate. I was wrong. After treatment and planting they all sprouted in less than two weeks and are about 2" high now in the seed window. I planted every single seed because they are all hydrids and cross pollinated. I want a few special cannas with coloured and striped leaves and various flowers. Most will be the standard green leaves with red flowers which I will probably give away, but I will keep any special ones.

I know these will do well indoors until they can go into the cold frame as I have a couple that I have grown indoors in pots since I dug them up in the fall. These are doing very well.

If you want more information about starting cannas from seed, you can find it in my previous post on spring seeding.


These are ground cherries sprouted in the seed window.

In the past month I have planted many of my vegetable and flower seeds and have them growing under lights in the south seed window. I can start tomatoes and peppers this early because I have lights in the window to supplement the day light and I have a cold frame to move them into mid April. The window lights are only on for a few hours in the morning and a few hours in the evening, giving them a longer day. I am looking for a more permanent indoor lighting set up at the moment.


These are garlic chives, just barely poking their heads above the ground.


Peppers are not up yet. They take longer to germinate.


I have planted so far this year: chives, garlic chives, ground cherries, rupine brussel sprouts, chichiquelites, several types of tomatoes, several types of peppers, cannas, bird of paradise, heuchera black magic, white and lilac datura, allium blue drumstick, dianthus siberian blue, campanula cup and saucer, sea holly and gaillardia. Some are up and some are not.I have also potted up some tender bulbs. I noticed that my best dahlias were drying up in the basement, so I potted them. I also potted special cannas, callas, elephant ears, other dahlias. I bought some edoes at the grocery store and potted those too.


I grew two dahlias in pots over the winter and they have done well, so far. As they get leggy I just cut them off and root the cuttings.


I recently acquired a couple of aquariums. This very large one will make a great little greenhouse for the peppers this spring!

I have many, many more seeds to plant indoors soon, which is one reason I wanted to start so early. It is probably going to take me that long to get them all planted!

We will still have vegetables that go directly into the garden, i.e. peas, beans, corn, cucumbers, potatoes and squash. I have a few new varieties of squash, Hopi black and Hopi pale gray, that I will be starting early indoors, as well.

All in all, I have been pleased with the results so far. The seeds are growing in the spare room at the top of the stairs, over the wood stove, so it is one of the warmest rooms in the house. It is also my studio, craft, storage and work room, so I am in there quite a bit. I love working in the "jungle"!