Showing posts with label garden. Show all posts

Grow Your Own Goji Berries


One of the so called "super foods" are the goji berries (also called wolfberries), ostensibly from Tibet where monks in the monasteries are known for their long life spans. I am sure this is the result of the book entitled "Lost Horizons" and not necessarily due to the longer life spans of the residents of Tibet.  

Regardless of the reasons for this, people are eating a lot of dried goji berries bought in health food stores. I buy mine from a bulk food store by the gram and have found this to be the cheapest way to buy them.

They will grow anywhere that has a winter. They don't need any special care and will flourish in poor soil and semi dry conditions. They are very easy, although slow, growers. The goji bushes should produce some berries in the third year with full sun and a little care, or so I have read. The goji berry bushes I have were grown from seed this past spring and are only about 3" tall right now. They have another two years to go before I will know for sure how long it takes to produce berries. Even if you do get berries in the third year, there probably won't be a lot of them. Of course, if you are growing them from seed, you can always plant a lot of bushes to have a bigger harvest sooner.


I grew my goji berry bushes from seed this past spring and had a good germination rate. It was an experiment, as I am always looking for interesting and unusual things to grow and trying seeds from many foods purchased. There is an important piece of information you should have if you are going to try growing goji berries from the dried ones purchased. The berries contain a chemical prohibiting germination, so you have to hydrate the berries, separate and wash the seeds, removing any pulp or juice from the berry. Its a very simple process and I have included directions below to help you.

The hard, dry purchased berries have to be soaked in hot water for a day or two to rehydrate. When the berries are soft and mushy, they are ready. Slit them open with a knife and you will see the seeds inside. They are very small. I use the knife to scrape the seeds into a fine strainer for washing.  


Hold the strainer under warm water and wash the seeds. Use your finger to stir them around in the strainer and remove any big pieces of pulp. Rinse the berries, while stirring around, for a few minutes until you are sure all the juice and most pulp has been removed.

I dump out the clean seeds on a papertowel and spread them out to dry. I let them dry for a week or so then place in an envelope and label.I keep out a few for planting myself and keep the rest for trading or giving to friends with a green thumb. After preparing a tray with soil and wetting it so that it is slightly damp, sprinkle the seeds thinly on the soil. Lightly sprinkle soil over them, but not much. Put in a warm location, keeping the soil slightly damp. It helps to keep it damp if it is covered. You should see the seeds sprouting in 4-6 weeks, or sooner. Mine took about 5-6 weeks to sprout but were in a cool window. As soon as the seeds sprout, move them into a sunny location to grow. Transplant outside when they are 2-3" tall.  They don't need winter stratification to germinate, although they will probably do well wintersowed.


This method can be used for a lot of fruits and vegetables from the grocery store. This is how I save my ground cherry seeds, as well. Some seeds may need a cold winter or scarification to germinate. You will just have to experiment.

This is what my goji berrry bushes look like now, after a summer of growing. I planted them in March but they have not had a good summer. They were kept in little pots longer than they should have been and were moved a few times, stepped on and generally mistreated. Your berry bushes will probably be quite a bit bigger and healthier than these after a full summer of growing in the right spot with tender care.  


UPDATE: I grew these until they were about a meter in length. They grew berries in the third year!!  


Growing Winter Squash & Pumpkins


Squash is one of my favourite vegetables from the garden. This also includes the sweet pumpkins, which are in the same family. It is so versatile and so good for you! It can be boiled, baked, sliced for the BBQ, grilled, baked in a pie for dessert and made into delicious soup. It can also be eaten with lots of real butter and a drop of maple syrup for a side vegetable dish.


I took an interest in the various different types of squash this year and planted five different kinds of winter squash. Having grown only hubbard, acorn and buttercup in the past, I was astounded at all the types of winter squash available out there. Some have long growing seasons and may not do well up here, but most of them look like they will produce well enough if started early indoors and given lots of hot, sunny weather. Unfortunately, we didn’t get the hot, sunny weather this year, but I think we will have plenty of squash, nonetheless.

In the actual vegetable garden, I planted hubbard, ambercup (a golden buttercup type), butternut and nutty delicata. I have never grown the nutty delica squash before, but I thought it sounded good. I love nuts and this is suppose to have a “nutty” flavour. It is a relatively new Japanese ebisu hybrid type. I have not previously grown butternut, either, although I have eaten it and seen it in the stores.


I planted acorn squash in the back field on the fence. Only two of those came up but I grew a very large acorn squash plant in the front flowerbed. It was an accidental dropping of the seed in the wrong place, but that bed was new and needed some greenery anyway, so I left it there. 


It took over a large part and is producing extremely well, much better than the same seed grown on the back fence. I think that is due to the extra chicken manure dug into the flower beds. It looked nice there too with the large golden blossoms and huge green leaves. I may consider doing that again next year. Is that what is referred to as a “Potager Garden” – vegetables mixed in with the flowers? I like it. It had four little squash on it until yesterday. I accidentally left the gate open and the chickens got into the front yard. They ate three of the little squash. I managed to cover the other one up with a bucket for the rest of the evening. They had not found it yet. The vegetable garden has a fence around it to keep out the groundhogs that live under the garage, so the chickens cannot get in there.

In my search for squash types, I found one in particular that interested me. It was the Hopi pale gray winter squash. I came across a reference to it as being an especially good “keeper”. These squash are an heirloom variety originally grown by the Hopi indians but have almost dissappeared. When I tried to find a source, I was dissappointed. The Hopi squash are very difficult to acquire. I did manage to get some seeds, in a trade from this year, 2009, for both the Hopi pale gray and the Hopi black squash, to grow for next year. Since they are from more southern regions I will start them very early next spring on a heating source. I am excited about growing these next year to test for the perfect squash and as a source of rare seed.

All of my winter squash plants have small squash growing on them, except for the butternut. The first female butternut flower opened this morning. I hand pollinated it. Even the long seasoned hubbard has small squash growing. We have had exceptionally cool weather this year. I don’t know why there is a difference. 

Perhaps the butternut need more heat? They are all in the same bed and have received the same treatment. I planted the butternut because I read that they were good producers, making a lot of squash on one plant. We will see how it goes…

I am looking for the perfect squash. One that is not stringy, keeps all year and has a fabulous, sweet and nutty taste. Is there such a thing?

Squash like to be grown in very light, loose soil so the roots are well aerated. They are nutrient hogs and like a lot of water, without being waterlogged (see previous sentence). I dug chicken manure into the hills where I planted the squash and I have occasionally fed them with organic commerical transplant fertilizer with a high phosphorus content, that I bought at a garage sale. Avoid using a high nitrogen fertilizer as this causes lots of leaves and few squash.

Squash, pumpkins and gourds are all from the same general family and all depend on bees for their pollination, so a small and dwindling bee population causes a poor harvest. (What will we do when there are no more bees?? ) Last year I had a lot of flowers and very few squash, signalling poor pollination. I am hand pollinating my squash this year and it has made a difference. All of the female flowers that opened were hand pollinated and are now growing small squash. This is exicing and so rewarding! I did that myself! It can be frustrating when the male flowers are plentiful and the female flowers have not opened yet.

Male Squash/Pumpkin Flower

The male flowers open first in the center of the vine. The female flowers are located further along the central vine and on the lateral branches. The male flowers are on taller stalks while the female flowers sit tighter against the branch on a little ball which, if pollinated, will be the growing squash.


Female Squash/Pumpkin Flower


To pollinate the female flowers you will need to use a small paintbrush. Just rub the paintbrush against the pollen in the male flower and then paint the pollen onto the center of the female flower. You can also pick the male flower, remove all but the pollen sitck and rub it against the center of the female flower. I prefer to use a paintbrush and leave the male flower growing where it is, to be used again later unless there are plenty of open male flowers.

There are many rare and delicious winter squash out there, yet to be discovered. Some are heirloom varieties that have been grown for centures in North America and have just slowly been replaced with the modern hybrids and genetically modified versions. One of the main reasons for that is the patenting of hybrid and genetically modified (GM) seed. Seeds from vegetables grown from patented seed cannot legally be saved by the grower for the following year. The farmer legally must repurchase these seeds each spring. Natural and heirloom seeds cannot be patented and so, there is no money in selling them. Large seed companies, such as Monsanto, sell only genetically modified and patented seed. The old fashioned heirloom varieties are slowing dissappearing. The gene pool is shrinking and we are losing valuable material. Not necessarily inferior material either!

We really enjoyed the little acorn squash last year, baked with maple syrup, raisins and dried cranberries and I know that hubbard and buttercup both make excellent pies. Some softer skinned buttercup varieties of squash do not keep very long, however, so they need to be cooked and frozen shortly after harvesting. I have read that the delica squash are not good keepers, either, so we will cook and freeze those when they are ready.

I have collected a selection of squash recipes that we have found to be delicious and have made many times. Winter squash and sweet pumpkin are interchangeable in any recipe, since they are the same thing. Pumpkin and squash are both members of the gourd family. No canned pumpkin will ever taste as good as the homegrown vegetable.

Indoor Herbs


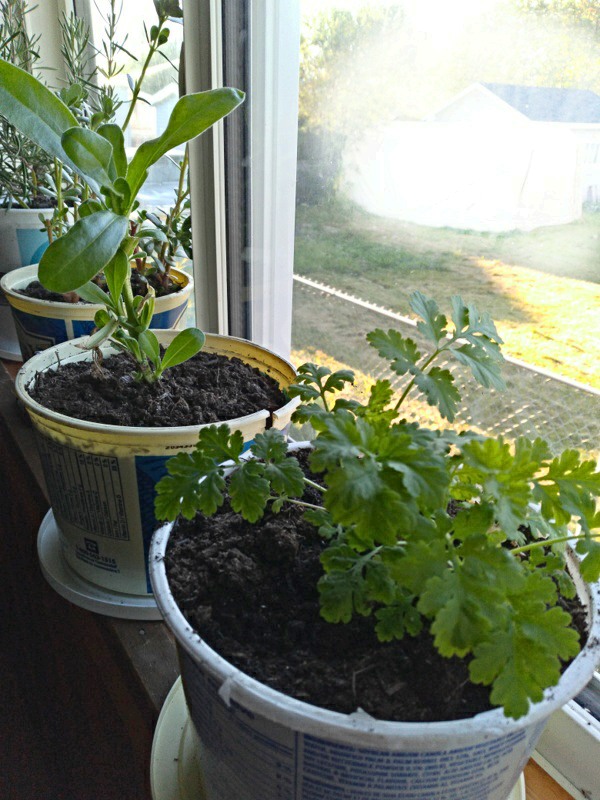
It's fall, here in Fort Nelson, BC, so I have brought in my tender herbs for the winter. Some are not necessarily tender, but they don't always come back in the spring up here. I treat the feverfew and purslane tenderly, as they are not available to forage or buy here. I grow them from seed, so I like to keep a small piece over the winter. I will start more in the early spring from seed, but I still like that safety net of having one growing indoors.

I have two south facing windows with big sills which are a good place to grow things, except in the darkest months. At that time I need additional lighting but it doesn't take much for these few plants.

I have brought in the lavender, rosemary, oregano, purslane, feverfew and one
calendula. This is the first winter I have tried calendula indoors over the winter, so I'll just have to see how it goes. If it fails, i can always grow again from seed. Those seeds are readily available just about anywhere."

Lasagna Gardening - How To Start A Garden


Contents of this very long article on starting a garden: 

- Lasagna gardening - an explanation
- How to make a no till garden on your lawn
- Raised gardens
- Organic Mulch Layers
- How to plant in a lasagna garden
- Weeding
- Going Vertical


Lasagna gardening is a no-dig, no-till organic gardening method that results in rich soil with very little work from the gardener. The name "lasagna gardening" refers to the buildup of layers of organic material on top of cardboard or thick newspaper, also known as “sheet composting."


One of the best things about lasagna gardening is how easy it is. You don't have to remove existing sod and weeds or dig at all. The first layer consists of either brown corrugated cardboard or at least six layers of newspaper laid directly on top of the grass or weeds in the area you've selected for your garden. Cover the garden areas with cardboard as soon as the snow is gone. Corrugated cardboard, that used for brown boxes, is best for the food areas. Worms love it! You can use other types of cardboard for the paths and open areas, i.e. soda can cases, cereal boxes, magazines. While you don't need to remove the grass and weeds, I would remove rocks. They are great for holding cardboard in place or using for stepping stones through the growing plants.

Wet the cardboard/paper area down to keep everything in place and layer with organic materials. The grass and/or weeds underneath will break down fairly quickly because they will be smothered by the newspaper or cardboard, as well as by the materials you're going to layer on top of them. Overlay the edges, or the grass will grow through! This layer also provides a dark, moist area to attract earthworms that will loosen up the soil as they tunnel through it. If you don't yet have organic layers, you can keep the cardboard down with rocks, bricks, logs or anything else you have that will keep it from blowing away. 

If you already have larger plants in place, layer the cardboard around them, giving them an inch or so of space to keep the wet cardboard from touching the stems. Layer organic mulch on top of this. Do this as the summer wears on and the initial paper/cardboard starts to break down. Continue to layer around the mature plants to keep the grass and weeds from growing. When making a garden on a lawn, grass will be a more insidious problem than weeds. 


It's a great way to get rid of your lawn. If you're on a reasonably small city lot, what do you need grass for anyway? It has no practical value and takes a lot of chemicals poured on it to keep it looking nice. (Why anyone would pour deadly, noxious chemicals in the earth for a useless lawn is beyond me.) If you have soft lawn, you don't need it tilled first. If you have hard clay, gravel, etc and are adding top soil/manure, I would till it first if you want to use it right away or make raised gardens. (See below.) If you are going to wait until the following year, let the worms do it for you under the cardboard. 


Raised Gardens: 

If your ground is very hard clay, gravel, sand or rock, I would recommend making raised gardens. They don't have to be deep but higher sides makes gardening easy for people with bad backs or physical limitations. Also keep it narrow enough to reach across from one side. Three feet is the widest across I would build one. It can be any length or even U-shaped. Build boxes to contain soil on top of the lawn. You will still need to do the layering with cardboard/paper inside the box. You would be surprised how far some grass and weeds will grow to survive! 

Filling the raised boxes: "Hugel Culture" (Hugelkulture) is making beds on top of log piles. Its quickly catching on as a way to make raised garden beds, letting the old logs feed the soil and plants. Fill those raised beds with natural branches and logs on top of the cardboard, before you fill it with soil. You will need less soil. Put several inches of soil on top of the wood. Layer this with mulch to keep the weeds down. They will grow on any open dirt spots, even in raised beds. The wood will decompose and feed the soil, gradually. The plant roots will grow into it. In three years the logs will be gone, making rich soil. 


If building tall boxes, fill the bottom with something to take up 
the space, something inert, nontoxic that the plant roots can grow around so you will need less soil. Top soil is hard to find here. Suggestions are: natural branches and logs (NOT railway ties, landscaping ties or pressure treated!), styrofoam packing pieces broken up small and styrofoam peanuts, small water bottles, crushed milk jugs, soda cans. Leave enough space for about 1.5 feet of soil on top, after it filters down through the space fillers at the bottom. Don't leave air pockets. Make sure the spaces are filled with soil all the way down. Mix in a little well composted manure in the bottom soil. 


You can make raised beds out of anything that will hold the soil in. Square straw (not hay!) bales are becoming popular for raised bed sides. Its not ideal to use pressure treated wood, but if you line the boxes all the way around and over the top with heavy plastic, it will be fine. You can use metal roofing or panels for sides.

Large logs make good raised garden sides. Cement blocks can be used if they have been outside for a couple of years so the strong lime has been leached out of them. Otherwise, I would line a cement block garden with heavy plastic. 

Raised bed are also easy to cover. Use 1" pvc for the arches, cover with plastic for a mini greenhouse, or curtain sheers for protection from deer, cabbage moths, etc. 


Organic Mulch Layers

Anything that does not contain meat, dairy, egg products of any kind, or sprayed can be used as mulch on the cardboard/paper. Meat products, eggs, dairy will stink terribly and attract wildlife that you don't want in your garden (bears!). Its also not a good idea to use processed food/ grains/ cereals in your compost pile. Never put cereal in it that has had milk on it! If you use something that has been sprayed with weed killer or herbicide, it will kill your plants. 

Some choices for organic mulch layers:

1. Manure! I would recommend using well composted ** (See Note below) manure around the growing areas directly on top of the cardboard/paper. If your lawn has been growing grass and/or weeds, the soil will be depleted. Also any wood based layers you have will use up the nitrogen in the soil as they break down. The manure will fix that and replace any other needs in the depleted soil.  
2. Grass clipping after mowing, if not sprayed, 
3. Fall leaves, mowed to chop them up, 
4. Shredded computer paper. Ask offices for it. Its wood based,
5. Wood chips * (See Note below on wood based mulch in the garden),
6. Straw,
7. Hay, only if going on top of cardboard. Don't put it directly on the ground or you will be growing grass there,

*NOTE: Wood based products are fine in the garden, as long as you add some well composted manure for extra nitrogen. Wood uses up the nitrogen in the soil to decompose. 

**NOTE: Make sure any cow/sheep manure you use has been properly composted: piled for a season so it gets really hot, hot enough to kill the weed seeds, or you will be growing grass and weeds. If you are not sure how hot it has been composted, put it underneath the cardboard. If it has not aged enough, the high nitrogen content will kill your plants. Chicken manure needs to age for two years before you can safely put it on your plants. Store bought manure is fine. 

Planting: For the seed rows, 

Option #1: Put down a layer of fine soil or compost on top of the mulch for the seed rows and plant in it. Top the seeds with soil and press down lightly. A rule of thumb for how deep to plant seeds: Soil on top of seed should only be as tall as the length of the seed. So something like carrot seed should only have a light sprinkle of soil on top. The roots will grow down through the layers and eventually through the cardboard. 

Option #2: Lay the initial layer of cardboard, leaving 1.5" - 2" inch rows open on the ground for planting seeds. Cover the cardboard with organic layers. On top of the organic layers, keeping it visible, cover your open seeding rows with cardboard you have weighed down with rocks or bricks to hold it in place temporarily. When planting time comes, most grass and weeds will be dead and smothered under the cardboard. Remove the top cardboard over the planting rows. Plant seeds directly in the ground in these very narrow rows and cover lightly with a layer of compost. Water very gently and press down lightly. 

For myself, I usually use a shovel and dig up just these narrow rows and remove grass clods, roots and any perennial weeds before laying down the cardboard. However, I don't believe its entirely necessary. I just like to spend a little time in the spring digging in the dirt :) . 

For transplants, simply pull back the layers of mulch, drop in the plant and pull some mulching materials back over the roots. Leave a little space around the plant for air circulation.

Weeding:  As you watch these rows grow, carefully leaving only the sprouting vegetables, pull up or cut off any weeds/grass that grows. If not sure, just leave it to grow awhile and then pull up or dig out any weeds that grow in this row with the vegetables. If left to grow, grass will become a more insidious problem than the weeds. As long as the weeds don't go to seed or interfere with the growth of the baby vegetables, they can be left to grow until its safe to remove them without damaging your tender, baby vegetable plants. There won't be much to weed out and once it's gone, weeding these very narrow rows will be easy. When the vegetable plants are tall enough and you have thinned them, place cardboard and mulch between the plants to keep the weeds/grass down. Keep placing cardboard and inches of mulch wherever grass and weeds begin to grow.

I recommend setting aside one day every week for weeding. Using a hoe for larger seedlings or by hand with smaller ones, weed the entire garden, covering with cardboard those areas where the grass and weeds are growing. If you have been using the cardboard everywhere around the plants and in the open areas, there won't be much to do. One morning a week, weeding needs to be your focus, everything else waits. If you do this, you won't have a weeding problem and gardening will be fun and easy. Pull baby weeds as you do your daily walk through your garden to see the changes and just to enjoy your garden growing. Pull any grass and weeds you see when they are little. Don't let the work get ahead of you or it will take time to catch it back up. Note: Control the grass. Grass is hard to control once it takes over.

Going Vertical


If you only have a little space, grow vertical! Make tall plants trellises over the pathways. If you are growing something like squash or 
melons vertically, you will need strong supports to hold the vine up and something extra to hold the fruit. 
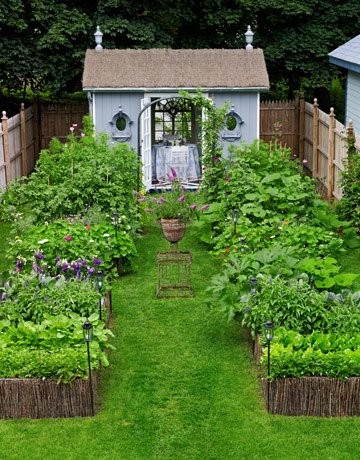
(Not my yard)

Lasagna gardening is definitely the way to build vegetable or flower beds! We use this method for both. Because it uses no power tools, heavy equipment or expensive commercial additives, lasagna gardening is an easy way for anyone to maintain garden productivity.

If you have deer or large dogs roaming around the neighborhood, you might want to put a fence around it. It will keep out the dogs, anyway...


Garden Reseeds - Volunteers


Does your garden reseed itself? Mine does, all over the place, but I like that! It gives me a second crop of everything, naturally. It's not in neat little rows, of course, it's in patches. Larges patches of spinach, green onions, chives, cilantro, thyme, oregano and anything else I leave to go to seed. I let everything go to seed because I have a seed store.
 

Much of it escapes before I harvest it and I always lose some in the harvesting anyway, so I get a lot of volunteers. I love them! I am still cutting from a large, reseeded patch of spinach resulting from just one plant left to go to seed. I have a lot of cilantro growing all over the garden. That stuff really grows wild! I have baby chives coming up all over, baby dandelions, baby purslane, baby thyme and baby oregano.

I'm sure I would also have baby catnip, mint and choc mint, if I let those go to seed too. I will probably let them go that long next year so I have seed for the seed store but this year I cut them back and dried them.
If you keep your garden spotlessly clean, weed regularly or mulch heavily you will never know the joy of harvesting volunteers. I like my garden the way it is. Everything grows well and is green and healthy, shown by the ability of the plants to reproduce themselves all over the place. I do pull some weeds, but the useful things get left to grow.

Regrowing Veggies from the Grocery Store


Spring is almost here and we are having spring like weather!! I am busy planning my garden space, old and new, for this coming season. One thing I want to grow this year are a lot of fresh herbs. I do grow thyme, oregano, sage and chives. This year I am going to add several more to this list.

I have seeds for basils, cilantro, rosemary, dill and a few more that I cannot remember at the moment. These things will grow from seed but it is a slow process, especially for the perennials, so I am attempting to root new plants from fresh pieces I purchased at the grocery store for the cost of a package of seeds.


Today I bought rosemary and last week I bought and planted terragon cuttings.

When I look through the packages of fresh herbs at the grocery store, I look for pieces that have tiny bits of root still attached. These will need less time to continue rooting and start growing. I am not sure this is root. It could be a piece of the stem that didn't break away cleanly but I will leave it there, just in case it is a root piece.

I don't know for certain that rosemary stems will root but I will try it anyway. I am not losing anything, as I will still have the pile of leaves that I stripped from the stems. I can continue to cook with those.


The first thing I did was fill a small container with light potting soil. I buy the inexpensive stuff from Walmart for this. It is better for rooting and seeding if you mix it with perlite, but I am not going to at this point. Mainly because I don't have any at the moment.


I use all kinds of containers to plant in. This is the bottom half of a vegetable juice cocktail jug with holes in the bottom. The aluminum foil is to catch the water that runs through when I water it. Dampen the soil with warm water before starting.

I use rooting hormone gel for this. I put a tiny bit in the corner of a throw away plastic thingie (its and industry term ;-). I keep my rooting hormone gel in the fridge. I have read that this gives it a longer life span. I don't know this from my own experience, but well, it can't hurt and it doesn't take up much room in the fridge.


Lay out the branches of the fresh herb. Remove all but a few leaves at the top. One piece with long enough for me to make two rooting pieces out of it with a few leaves left at the top of each one. When this is done, recut the bottoms of all except the pieces with a slight root still attached. Leave that alone.


Dip the end of each piece in the bit of rooting hormone. Poke a small hole in the damp soil and insert the end. Fill in the soil around it.


I plant all pieces in one container together. It takes up less room that way and it will be awhile before they are so big that they need a pot of their own. I am hoping they can go into the cold frame, or even the ground, by that time.


These are the terragon cuttings I rooted a few days ago. They wilted at first but seem to be perking up now. I did not cover these with anything but I am going to put a bag over the rosemary to help keep them moist while they root. Put the cuttings in a light place but not in direct sunlight until you see real, new leaf growth.


I am looking forward to using these fresh herbs from my garden this year. I use them to make soap, as well as cook with them. One thing I want to make this year is a lot of pesto! I might also make myself some herbal bath oil, hand lotion and hair rinse.